|
|
Post by 62astro on Oct 14, 2009 10:46:50 GMT -5
Looking for aluminum C channel to make wings and came across this site. This looks similar to the wings I have from a Starflyte. Doesn't look like they have the C Channel, does anyone know where that can be found? Is the channel that's on the newer wings ('65 and later) the same style that was used on the earlier wings? www.onlinemetals.com/merchant.cfm?id=852&step=2&top_cat=60 |
|
|
|
Post by jaydar1968 on Oct 14, 2009 11:21:37 GMT -5
I've been looking to locate the ideal C Channel as well but haven't had much luck. There is some out there but not what I am looking for. I am considering buying it in strips and using a brake press to form the channel myself. I don't have a set of wings to compare to, but by looking at photos, etc. it looks to me that is the way it was originally done. I would venture to say Shasta did not use an aluminum extrusion C Channel on the original wings, but I may be wrong. Any thoughts on that from anybody? In case you haven't seen it, here is a link to the process one person used to make their wings: www.freewebs.com/kc8jwa/wings.htmScroll down to where it starts "RUTH'S "IMPROVED" TECHNIQUE". It looks like they used an aluminum extrusion that they found through a bathroom fixture supplier and they supply some links. They even have detailed instructions on how to bend the aluminum around the front curve. In my opinion, the only drawback of using this C Channel was the shipping cost. Good luck and let me/us know how things turn out. Jaydar |
|
|
|
Post by 62astro on Oct 14, 2009 18:28:33 GMT -5
I think I'm going to take one of the wings apart from the Starflyte to get a better idea of what the C-channel is like. There's only one pop rivet so it should go back together without too much problem. Also, debating if I should just use them even though they're small. My wife says I have wing envy, I say they're not original size. I'll post a picture of Starflyte wings once I get it apart.
|
|
joek
250 Post Member
 Inside Out
Posts: 324
|
Post by joek on Oct 14, 2009 21:13:42 GMT -5
I have one wing, it came with the trailer. It was also folded in half, so it's not a useable wing, but I plan on using it as a model. Maybe it is not original, but I up until now I always thought so. It does not use a C channel though, it uses 2 L pieces, very similar to table edgeing. On the area where it goes to the body, it is only as thick as the L-metal is wide, then becomes double thickness at the area that is free in the air. Here is my mangled wing. It measures 42" x 9" overall. 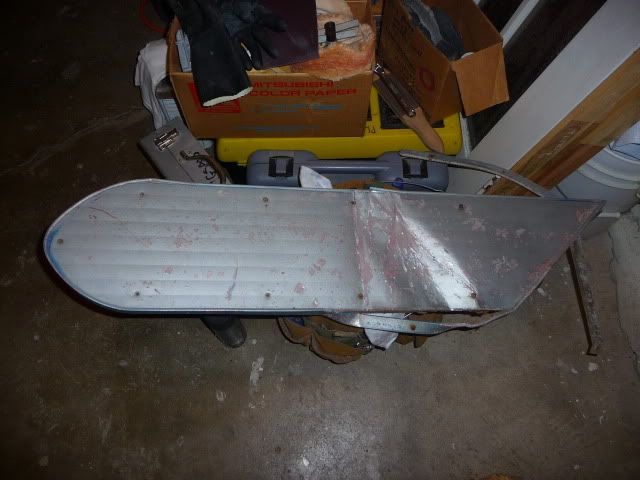 Here is the backside. I like the way the front of the wood frame is kinda U shaped, so if it expands or contracts it won't tear things apart. 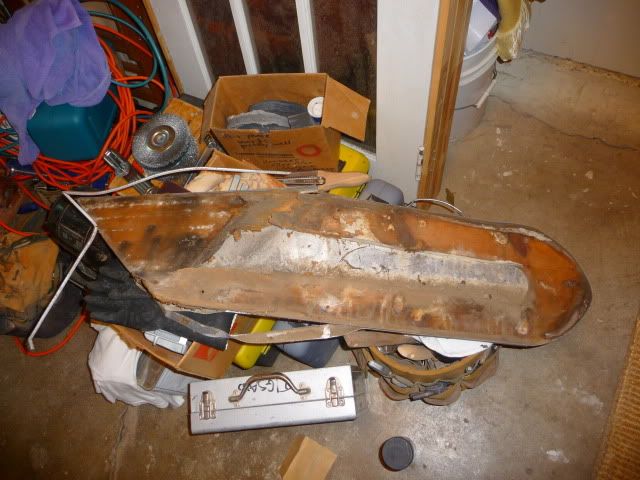 And here is the top edge, showing the 2 pieces of metal. 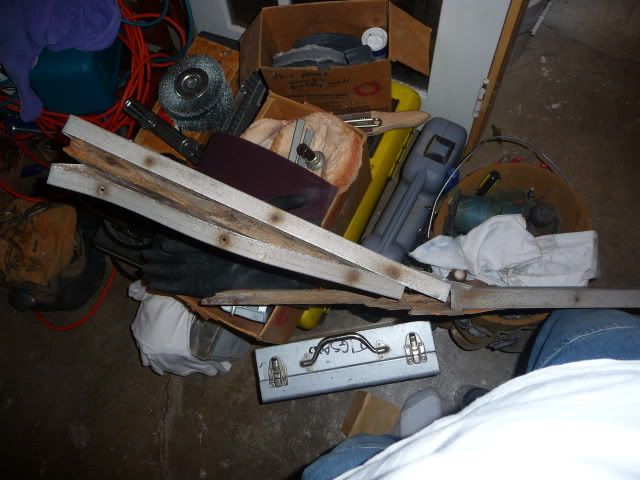 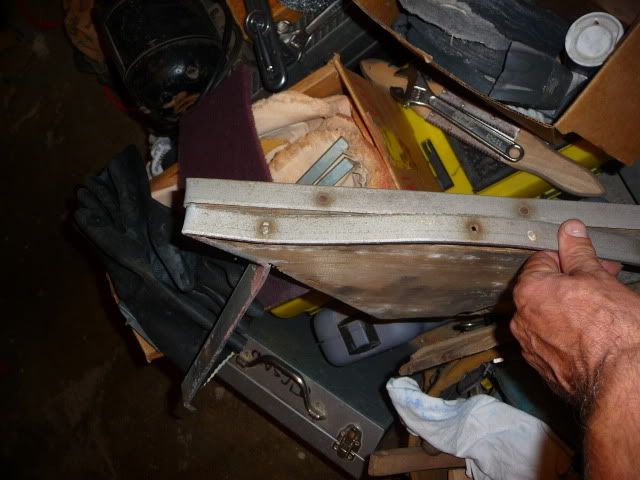 I'm pretty confident this is original to my trailer, as the wood frame looks like the same pine material the framing is made of. Although it is not a very good design to keep water out with the 2 piece channel, there were other poor construction choices when they built my Shasta. |
|
|
|
Post by 62astro on Oct 15, 2009 9:42:49 GMT -5
Thanks for the pics Joe. I would say your wing is original too. The textured aluminum link I came across is similar to the '65 and later trailers.
Using L shaped trim should be considerably easier to make than a C-channel. Trying to visualize the constructon. The part that mounts to the trailer, did it have an aluminum backing or is the wood exposed to the trailer? How far apart are the ribbing lines? On the part that sticks past the trailer on the "inside' part of the wing, is the aluminum smooth or is it ribbed like the other side? Where there's 2 pieces of L trim does the inside piece wrap all the way around the free air part (is there L trim on the part that's up against the trailer)? What are the dimensions of the L shaped trim? Is it the same as what is used on the table and countertop of your Shasta?
Thanks,
Adam
|
|
joek
250 Post Member
Inside Out
Posts: 324
|
Post by joek on Oct 15, 2009 21:18:00 GMT -5
Happy to help however I can. Hope these are the answers you are looking for. On mine, there was no aluminum on the backside at all, but I believe there was never any at the area that goes against the trailer. I do think there was some on the backside where it hangs free, though I personally do not know if it was smooth or had the ribbing. The ribbing on the front is on a 1" pattern. The L shaped trim, on the outside, goes all the way around the wing, and the seam is at the top. On the inside, or trailer side, it only goes around the part that hangs free. So the part which hangs free is twice as thick as the part which goes against the trailer. The L-mold is not the same as the table trim. The short side of the L is the same, but the long side is different. Measuring the inside of the L, it is 7/8" x 3/16". It is very similar to this product, tinyurl.com/yzwuyca even down to the 6" spacing, except mine is defineatly 7/8", whereas this one measures 13/16". I think I will try and use this VTS product for mine. If you have any more questions, or would like more pics, let me know. |
|
|
|
Post by Atomic Addiction on Oct 15, 2009 21:38:35 GMT -5
Joe,
There was a backing piece on the wooden wings. The piece only covered the exposed area. The area covered by the trailer is not covered but that seems silly to me. Guess they did that to save cost.
The ones I have seen that are original did have the horizontal pattern on it also. The back piece was cut curved and followed the line of the trailer's profile.
Brian
|
|
|
|
Post by 62astro on Oct 16, 2009 11:29:15 GMT -5
Joe, thanks for the link for the trim. Did your wing have spacers between the wing and trailer? The ones I removed from the Starflyte ('67ish) have 1/2" - 3/4" spacers between the wings and trailer to clear the edge molding. The wings from Starflyte are: finished on both sides, the same thickness all the way and used a C-channel instead of L-channel (but they're from a newer trailer and smaller size, posted this for others if they're interested). I think when I build mine the whole wing will be finished.
|
|
|
|
Post by 62astro on Oct 16, 2009 13:00:11 GMT -5
|
|
|
|
Post by 62astro on Oct 16, 2009 14:17:00 GMT -5
|
|
joek
250 Post Member
Inside Out
Posts: 324
|
Post by joek on Oct 16, 2009 18:07:57 GMT -5
No on the spacers. The trailer molding stops at the wing and starts again at the other side. I think mine will still be open at the face against trailer, though I'll use something more weatehr resistant, like Mahogany or White Oak, for the frame.
I think the 13/16" size is better than the 7/8" anyway, as the wood I'll use will be 3/4" and the aluminum skin is closer to 1/16" than 1/8".
|
|
joek
250 Post Member
Inside Out
Posts: 324
|
Post by joek on Oct 16, 2009 18:10:13 GMT -5
Anybody know if the anodizing of the metal that VTS sells will effect my ability to temper the aluminum in order to make it able to make the bends?
|
|
|
|
Post by 62astro on Oct 19, 2009 16:19:08 GMT -5
Here's another place that sells the aluminum molding The Kitchen Store, Culver City, CA. 310-839-5215 www.studiosupplier.com. They have the 3/4" inside measurement ($11.43/12') and 7/8" ($12.70/12'). They cut it down to 8' ($5.00 cutting charge) and will ship all of it UPS. I ordered from them so I guess I'll find out how good it is. Shipping was $20, total $50.40. Once I get this I'll attempt to build them. www.studiosupplier.com/aluminummoulding.htmlAdam |
|
joek
250 Post Member
Inside Out
Posts: 324
|
Post by joek on Oct 20, 2009 1:31:23 GMT -5
Thanks for the tip. I'll be looking forward to hear about how it goes.
|
|
|
|
Post by 62astro on Oct 26, 2009 15:10:25 GMT -5
The L channel came on Thursday, so I tackled the wings this weekend. The channel bends really easy, I did not have to heat it to bend it, some shaping with the wider part with a hammer. The front bends did not distort at all, the lower back bend had a slight distortion because I did not trim any of the edge out - it could be hammered out but not that big of deal. I ordered the 7/8" so there's about 1/8' overhang on the back side. I figure it will be good when I caulk/seal/glue it shut - I'll post pics soon.
|
|
|
|
Post by Red Dirt on Oct 26, 2009 15:23:31 GMT -5
Okay, where are the pics? You really can't post a story about rebuilding wings without pics. I think it might actually be against the rules. (not really, but seriously, where are the pics?) ;D
Red Dirt
|
|
|
|
Post by 62astro on Oct 27, 2009 12:32:05 GMT -5
I know, I know, I thought I would tease a little  . Actually had the post typed up and then camera batteries went dead  and had to recharge them. I can't figure out how to attach more than 1 picture in each post, the size of 1 picture is 374KB. Any ideas? I'll make more than one post this time. I used aluminum flashing from Menards, one thing I would point out if using this is to make sure your newspaper underneath is perfectly smooth. The appearance of kinks in the scores is where one newspaper ended and another was overlapping. I used a knitting needle to make the scores. Attachments:
|
|
|
|
Post by 62astro on Oct 27, 2009 12:36:03 GMT -5
I thought the trim was easy to work with. Attachments:
|
|
|
|
Post by 62astro on Oct 27, 2009 12:37:59 GMT -5
I nailed the trim down as I went, so working this out now isn't really possible. Attachments:
|
|
|
|
Post by 62astro on Oct 27, 2009 12:47:07 GMT -5
Took some out of the middle to lighten it up. I used 3/4" plywood, I will seal the seams with Dow Corning RTV sealant, 832 Multi-Surface Adhesive Sealant in gray. This stuff is an OEM type sealant. A few years ago we had an ag/machine shop build stainless steel counter tops for our house and they recommended it to glue the stainless steel to the plywood bases I made. They build livestock waterers (sp?) and use this sealant for their construction. Once it sets, you will not get it apart without destroying whatever it's attached to. Looking for some 3" stainless steel screws to attach them. Attachments:
|
|
|
|
Post by franksshasta on Oct 27, 2009 18:16:47 GMT -5
Nice job. Looks great.
|
|
|
|
Post by 61shastacompact on Oct 27, 2009 21:50:20 GMT -5
Looking for some 3" stainless steel screws to attach them. Be careful with the length of screw that you use. 3 inches seems a little long. I have heard of folks screwing down their wings only to find new screw tips sticking through their interior wall.  Nice job on the wings! Are you going to put a piece of aluminum on the back side on the rear of the wings to cover the wood as the factory wings had? |
|
|
|
Post by 62astro on Oct 27, 2009 22:33:43 GMT -5
Yes, I was wondering if 3" will go too far. How thick are the walls? The wings will be spaced away from the camper to clear the drip rail, so 2" isn't long enough. Maybe 2 1/2" would be suffice. I will finish the inside of the wing. I haven't decided what to do yet. At first I was going to add the small section that goes at the back of the wing like the older trailers have to make it look thicker from the back and finish the rest with smooth flashing. But, I wasn't pleased with the way it turned out. I didn't pay attention to the nail holes when bending the edging for the small inside piece and so the nail heads are not right next to each other and I think it looks hacked together. So I might just make full pieces for the inside and the wing would be uniform thickness like the later trailers used, only not as thick. The conundrum is my wife likes the extra piece added on and says no one will notice what I'm looking at. Also need to find something to use for spacers. I was thinking of cutting plastic conduit to the right thickness. Or would like to find some solid plastic dowel if it's available. Anyone know? |
|
|
|
Post by 61shastacompact on Oct 28, 2009 20:46:37 GMT -5
Wall thickness is 3/4" for the framing + ~1/8"to 3/16" for the interior panel. Since your wings are 3/4" plywood I would use 1.5" as a base length of the screw and add for your spacer if needed.
Doesn't your trailer have a break in the drip rail where the wings mount??
Jim
|
|
|
|
Post by franksshasta on Oct 29, 2009 8:33:38 GMT -5
"I believe that Shasta ditched the the wooden wing around 1960 and went to the all aluminum one. So a model that has a solid drip rail molding used a all aluminum wing with rubber spacers to clear the full drip rail". This is per Brian "Atomic Addiction"
|
|
|
|
Post by 61shastacompact on Oct 29, 2009 17:57:32 GMT -5
For the record, my 61 Compact had the solid wooden core wings and a break in the drip rail for their mounting. I wasn't sure about the 62astro.
|
|
joek
250 Post Member
Inside Out
Posts: 324
|
Post by joek on Oct 29, 2009 18:08:59 GMT -5
My '61 16' also has the wood cored wings and break in the drip rail.
|
|
|
|
Post by franksshasta on Oct 29, 2009 19:09:19 GMT -5
HMMMMM....very interesting. The plot thickens. Anybody with a 62, 63, 64 want to chime in on this?
|
|
|
|
Post by 62astro on Oct 30, 2009 17:42:54 GMT -5
Our 62 does not have the drip rail cut out. I think I'm going to add a full piece of scored aluminum to the inside of the wing and forget the extra wrap around piece. Sounds like '61 and older had the wrap around piece since the wings were mounted flush to the trailer. Jim, thanks for the dimensions looks like 2" is all the longer I will be able to go. These are on ebay right now, not mine, and the next size smaller than what I built, but should be the same basic idea on how they built the 'newer' style wings. cgi.ebay.com/ebaymotors/ws/eBayISAPI.dll?ViewItem&item=350269998899&viewitem=&sspagename=STRK%3AMEWAX%3AIT |
|
|
|
Post by Rusty Wings on Nov 1, 2009 6:52:49 GMT -5
These came out great. Nice work!
|
|


 . Actually had the post typed up and then camera batteries went dead
  and had to recharge them.


 See my rebuild pics at: