Deleted
Deleted Member
Posts: 0
|
Post by Deleted on Jul 26, 2012 14:47:19 GMT -5
Hello all, It’s been ten days since I brought home our Shasta…so far no big surprises. The framing and some of the floor in the front end was rotted. The plywood curves in the rear end need some attention. But overall the framing is in decent shape and fixing the rotted stuff won’t be a problem. A couple of observations: After pulling the black water tank it’s easy to see why mice take up residence in these things. There was no effort by Shasta to keep this trailer tight…the cut out under the black tank was excessive. Another thing I can say for sure about Shasta, is they sure liked there flathead standard screws. I hope I never see one again. Taking the cabinet out was a pain to say the least. I’d say one more day of demolition then I can start putting it all back together…that should be much more enjoyable.  |
|
Deleted
Deleted Member
Posts: 0
|
Post by Deleted on Jul 26, 2012 14:49:13 GMT -5
interior  |
|
|
|
Post by universalexports on Jul 26, 2012 17:24:59 GMT -5
yep, she is gutted, watching your progress with interest.
|
|
Deleted
Deleted Member
Posts: 0
|
Post by Deleted on Aug 24, 2012 19:37:59 GMT -5
Hello all, It’s been a little while since I last posted my progress, so here’s where I’m at. It seems that I kept saying to myself, ‘I’m this far into the project I might as well go a little farther and fix this too’. I said that to myself a lot…the result was that I ended up stripping the camper all the way down to the frame. I guess I’m not one to let something that’s questionable go. Anyway, it’s all starting to go back together. Since the demo was completed I’ve sanded and painted the frame and wheel wells, replace some of the wood framing with new pt wood, painted and installed Homasote 440 Composite Sound Board, new plywood subfloor and lags bolts. Over the next couple of weeks the new Armstrong vct checker board floor will go in an then the walls will be reframed, paneled and installed. I was fortunate enough to find a local specialty plywood dealer who had 1/8 birch in 4x8 sheets. A bit pricy at $39 a sheet, but at least I found some. From here my plan in to modernize all the systems but keep the interior and exterior looking as original as possible. My wife is looking for her garage space back, so I guess I better get a move on. Regards Steve  |
|
Hamlet
2K Post Member

Posts: 2,241 
|
Post by Hamlet on Aug 25, 2012 9:43:27 GMT -5
You won't regret taking it down to the floorboards... in the long run. Looking good!
|
|
Gone Kayaking
1K Post Member
long live the Vintage Shasta Trailer Forum....we're gone but you are not forgotten!
Posts: 1,600 
|
Post by Gone Kayaking on Aug 26, 2012 13:40:51 GMT -5
Agree, if I was doing over and had a nice workspace like you do, that's what I'd be doing. Also I think paying for quality birch ply is a smart investment, the cheaper stuff I got at $20 per sheet has a razor thin veneer....which I learned the hard way.
|
|
|
|
Post by schweetcruisers on Aug 26, 2012 15:27:33 GMT -5
Been there!
|
|
|
|
Post by flyingham on Aug 26, 2012 20:07:43 GMT -5
Been there too! You won't regret the price on that plywood. It will save so much time over big box store garbage. I wasted a week of valuable time making cheap plywood look nice. Tyler has some really nice photos posted on his blog for ideas.
Are you salvaging the waste water tank? I did, it was easier than replacing it. And I ditched my fresh water tank. (gained some space)
Keep up the good work!
|
|
|
|
Post by kto17 on Aug 26, 2012 21:37:17 GMT -5
Been there too! You won't regret the price on that plywood. It will save so much time over big box store garbage. I wasted a week of valuable time making cheap plywood look nice. Tyler has some really nice photos posted on his blog for ideas. Are you salvaging the waste water tank? I did, it was easier than replacing it. And I ditched my fresh water tank. (gained some space) Keep up the good work! Jeff, did you ever find good 1/8 th inch birch ply in the Atlanta area? Steve, wish I had the time to be able to do that to ours. Looking good! |
|
|
|
Post by flyingham on Aug 27, 2012 7:51:56 GMT -5
Yeah, Suwanee lumber has it in stock. If I remember correctly, it was about 28 per sheet. They have a website. Cool place
|
|
Deleted
Deleted Member
Posts: 0
|
Post by Deleted on Aug 27, 2012 21:49:30 GMT -5
Thanks everyone for the encouraging words…after I finished the demolition I looked at my garage (which looked like a bomb went off) and said to myself, ‘what have you done’, lol. It’s amazing how much stuff comes out of one of these little trailers.
FlyingH, unfortunately the tank was junk. I’m replacing it with separate black and grey water tanks. We camp in the White Mountains National forest campgrounds on occasion so being self contained is important to us. Because of that I’m also putting in a new fresh water tank and installing a 12v battery and converter.
Regards
|
|
Deleted
Deleted Member
Posts: 0
|
Post by Deleted on Oct 5, 2012 16:04:38 GMT -5
It's been a while and the rebuilt isn't progressing as quickly as I would like. Here are a couple pics in her current state. Next up, systems, Propane, trailer lights, electrical, fresh, black and grey water. That should keep me busy for a while. 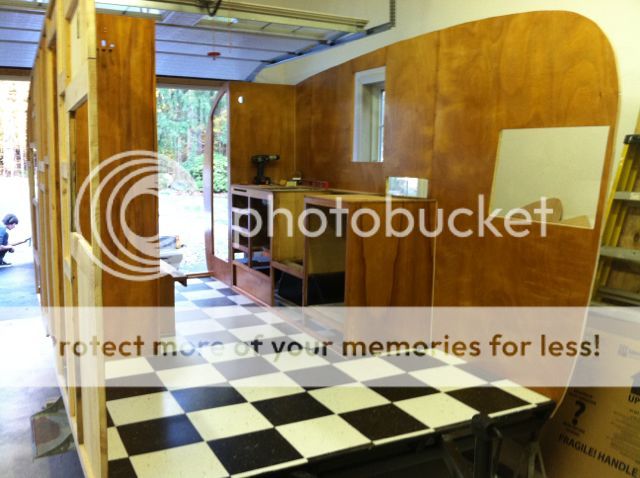 |
|
Deleted
Deleted Member
Posts: 0
|
Post by Deleted on Oct 5, 2012 16:06:58 GMT -5
pic  |
|
Hamlet
2K Post Member
Posts: 2,241
|
Post by Hamlet on Oct 6, 2012 15:32:33 GMT -5
Beautiful trailer, beautiful work!
|
|
|
|
Post by universalexports on Oct 6, 2012 17:02:16 GMT -5
looks like it is coming along Great, at least you have an inside place to work on it.
|
|
|
|
Post by lynettekarasz on Oct 6, 2012 18:12:16 GMT -5
Love it, Steve. I'm redoing a 63 also, she has been taken right down to the frame. We should both be done about the same time.
Lynette
|
|
soup
1K Post Member
Posts: 1,768
|
Post by soup on Oct 7, 2012 5:21:35 GMT -5
Having enough space indoors to work on is all the difference in the world between frame off restore and remodel/repair. That work area is AWESOME! Your work looks to be just as awsome. It great to have evironment control, solid/level flat platform to work off of instead of gravel/dirt, and a roof overhead. Plus it looks like you got space for materials and a work bench too?  I can only dream of such a nice space to work out of. I'm so sick of weather determining my work schedule! Great work, it really looks good! Good Luck and enjoy. Soup  |
|
Deleted
Deleted Member
Posts: 0
|
Post by Deleted on Oct 17, 2012 17:04:25 GMT -5
Hello all, The last couple of weeks have bee productive. I was able to get the ceiling panels shellacked and installed. The font end and the ceiling framing are also done. There is still plenty to do before I address the skin issue. I’m still in the process of collecting parts for the electrical and plumbing systems. I also need to build the front dinette. It’s starting to get a bit cool now so I really feel fortunate to have some garage space, which will allow me to keep plugging away. Hopefully by Christmas the interior, windows and misc metal will be done. The trailer will be 50 in April…that’s the completion date I’m shooting for.  |
|
cowcharge
1K Post Member
I suffer from Shastasomiasis.
Posts: 1,471
|
Post by cowcharge on Oct 20, 2012 5:46:10 GMT -5
Ah, to have an indoor workspace...
|
|
|
|
Post by cstillman on Dec 15, 2012 15:49:34 GMT -5
I am sooo jealous of your workspace. Your trailer is coming along beautifully. Nice work!
|
|
|
|
Post by paigenmarc on Dec 15, 2012 19:32:45 GMT -5
What I wouldn't do to have a huge workspace for our redo. Having to fight the heat and rain makes it take twice as long and wears you out. You are smart to take it slow and do it right.
|
|
Deleted
Deleted Member
Posts: 0
|
Post by Deleted on Dec 19, 2012 20:17:05 GMT -5
Yah, having the indoor space is nice...after the holidays the project starts up again. I'll be polishing a lot of metal and windows in the shop. Happy holidays to all!
|
|
|
|
Post by flyingham on Dec 19, 2012 20:31:21 GMT -5
Working indoors really is key. To not have to worry about the damn weather is where its at. I got lucky and borrowed space from my neighbor.
Jet skier! I was too. 20 years ago. Makes my back ache seeing it, LOL. Tons of hours on a modded 550 with a 440 pump!
|
|
|
|
Post by schweetcruisers on Dec 19, 2012 20:31:51 GMT -5
I hated every minute of windows! Good Luck, I just cleaned mine to a mill finish, can't imagine having to polish them!
|
|
Deleted
Deleted Member
Posts: 0
|
Post by Deleted on Dec 19, 2012 21:09:58 GMT -5
Flyingham, my teenage son picked up that jetski on CL, I haven't had a chance to try it yet. I have a seadoo rxt, A lot quicker and smoother ride but still fun.
Schweet, I'm not sure how crazy I'll get polishing the windows but I will put time into the window drip edge, wings and other aluminum trim. BTW, I checked out your blog, Your trailer is looking great! Can't wait to see it done...nice work!
|
|
Deleted
Deleted Member
Posts: 0
|
Post by Deleted on Jan 12, 2013 14:34:56 GMT -5
My winter metal polish work has commenced. Here’s a pic of wings and drip rail before and after. They’re a little bit of work but clean up nice.  |
|
Hamlet
2K Post Member
Posts: 2,241
|
Post by Hamlet on Jan 12, 2013 14:52:58 GMT -5
"Little bit." smccusk, you are the ultimate optimist. I think I ruined several tendons in my arm polishing Hamlet's wings.
|
|
|
|
Post by janesfaces on Jan 12, 2013 21:32:36 GMT -5
I need to polish Miss Shasty's wings....can I ask how/what you used to get them so shiny? They look great! Mine are just like your "before" pic.
Thanks!
|
|
Deleted
Deleted Member
Posts: 0
|
Post by Deleted on Jan 13, 2013 11:33:30 GMT -5
Janesfaces: I’m new to this so this may not be the most efficient method of cleaning up metal. First I did a rough sanding with 320 grit sand paper to get the heavy oxidation off, then went down to 400 grit paper. After that I wet sanded with 600 grit paper. At that point it looked pretty clean but I wanted to clean up the creases better so I hit a few spots with 0 steel wool. I did a final sand with 00 steel wool and then polished it with a polishing disk mounted to a drill. I used Noxon metal polish. A lot of people here recommend Mother aluminum polish but the local hardware store didn’t have it…once I find some I’ll give that a try. Hope this helps
|
|
Deleted
Deleted Member
Posts: 0
|
Post by Deleted on Jan 16, 2013 15:42:18 GMT -5
Universalexports mentioned he preferred wet sanding with steel wool and spirits. I gave that a try using steel wool and denatured alcohol, one pass 0 wool and and pass 00 wool. It worked far better than what I was doing. Universalexports thanks for the idea you saved me a whole lot of elbow grease.
|
|