|
|
Post by sfhurst on Nov 2, 2009 14:10:35 GMT -5
The screens on my 1954 Shasta pushout windows need to be replaced. It would appear the screens are simply stretched over the interior frame then tucked under the lip that runs around the outside of the frame. How do you get the screen both stretched tight AND stay tucked into the lip?
BTW -- A HUGE THANK YOU to all of you that have taken the time to answer all of my Shasta questions.
|
|
|
|
Post by 61shastacompact on Nov 2, 2009 23:42:30 GMT -5
Info on your window screens is also available at VTS in the link in your other thread. Galvanized screen is used and an offset wheel is used to roll the edge to hold in place.
Jim
|
|
|
|
Post by Shutzee on Nov 3, 2009 8:36:18 GMT -5
I replaced all my window screens yesterday. It is an easy process. Any hardware store will have the items needed. I didn't use aluminum screening, used some I already had. Just do a search on the web for replacing screens in metal frames.
Good Luck,
Shutzeegirl
|
|
|
|
Post by 61shastacompact on Nov 3, 2009 22:01:52 GMT -5
The old style screens are not like the one you just did Shutzeegirl. There is no metal frame and no place for the spline to hold the screen.
They instead used a rigid galvanized steel screen and merely rolled the edge over a lip on the window frame. If you have the original ceiling vent on your Shasta Compact Shutzeegirl, look at the screen on it and how it is attached for a better idea.
Again, the screen and offset wheel for this style is available at VTS as well as more info on the process.
Jim
|
|
|
|
Post by sfhurst on Nov 4, 2009 18:43:29 GMT -5
Thanks. I just ordered the wheel and got some aluminum screen from my local hardware for way less than what Vintage trailer wanted for a roll of galvanized screen. My concern is that the aluminum screen probably won't have the rigidty to stay tucked into the lip. Oh well, if it doesn't work I'll chalk it up to learning.
|
|
joek
250 Post Member
 Inside Out
Posts: 324
|
Post by joek on Nov 4, 2009 21:13:52 GMT -5
Here is a pretty good shot of my rear window and the screen during removal. 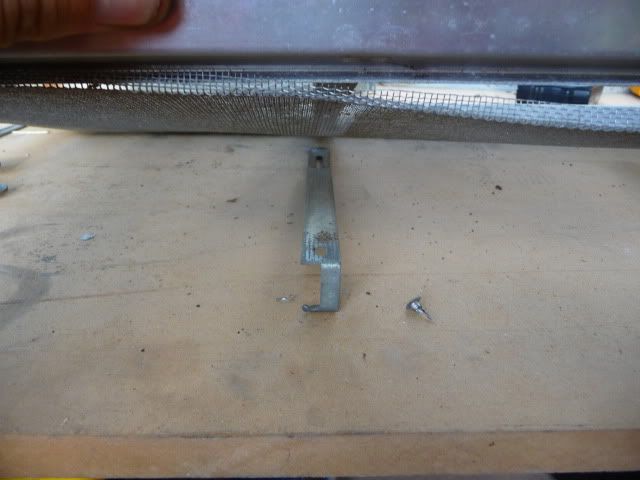 Notice the screen goes into the lip and is pressed in, like Jim is describing. But do you also see the drilled out rivet lying right of center? The screen was sandwiched between 2 stiffener bars, with a slot cut in the middle for the window stay to go through. At least this is how mine is built. That rivet is not a standard pop rivet, but a semi tubular rivet that requires a specialty tool, the hand tool option is called a Tatco hand rivet squeezer or a Texas rivet tool. In this location, a pop rivet would probably work though. |
|


 See my rebuild pics at: