Hamlet
2K Post Member

Posts: 2,241 
|
Post by Hamlet on Jun 5, 2011 22:21:47 GMT -5
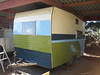
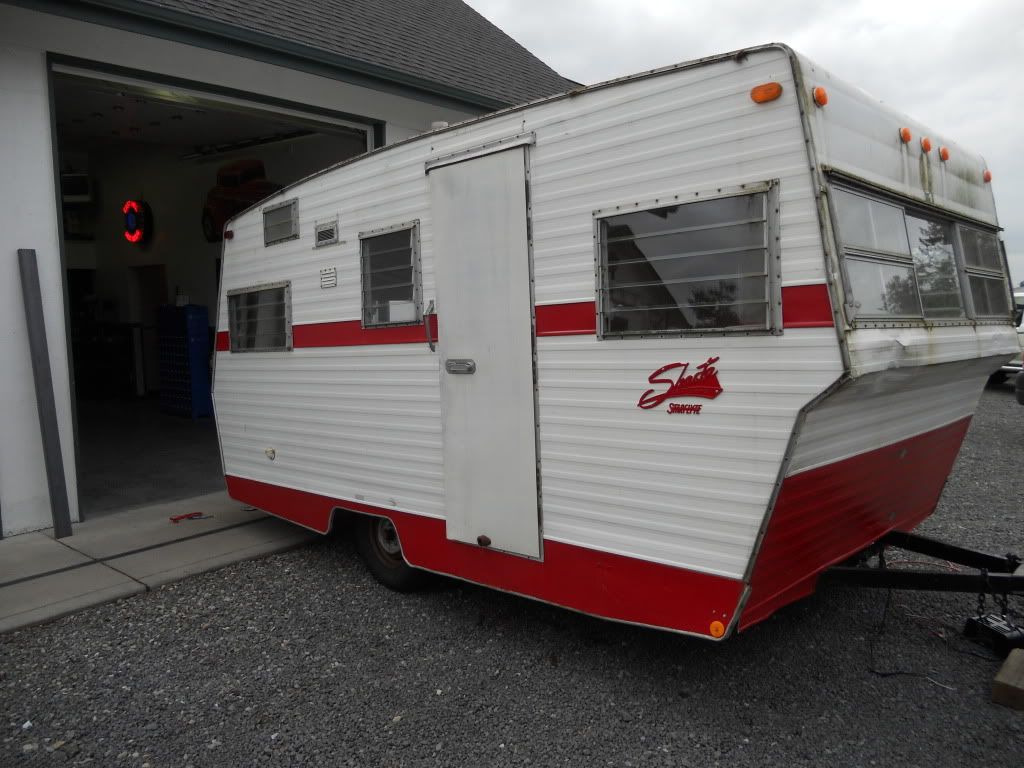
We bought our little Compact in October, 2009. We knew nothing about travel trailers, vintage or otherwise. We saw the picture on E Bay and knew it was exactly what we wanted. So we bid, won, and drove from the SW corner of Washington state to the NE corner. Luckily love is blind, because if we had known what we were getting ourselves into... oh shoot, we probably would have done it anyway. Here are some pictures of the 18 month restoration. We kept the vintage look and feel, but did some modifications that made it work for the 21st century: a higher roof, long benches shortened into a full size bed and added a closet and cupboard, and turned the closet into a bathroom. We took our little "Hamlet" (he's too small to be a full canned ham) on his first road trip in April. I'm hoping the Flickr link will work. If not, just copy and paste into your browser. www.flickr.com/photos/63792423@N08/sets/72157626770355199/ |
|
|
|
Post by dragthepaint on Jun 5, 2011 23:43:00 GMT -5
Link Broken
|
|
Hamlet
2K Post Member
Posts: 2,241
|
Post by Hamlet on Jun 5, 2011 23:46:49 GMT -5
Rats, I'll try to figure it out tomorrow. You can still copy and paste, though, I think.
|
|
jessie
100 Post Member
 Abbey, our 1969 Compact
Posts: 130
|
Post by jessie on Jun 6, 2011 0:04:26 GMT -5
I got the link to work and the pictures and story are great!!! what a labor of love... but WELL worth it!!
|
|
|
|
Post by diamondrelics on Jun 6, 2011 1:12:00 GMT -5
Hamlet looks awesome! way to go!
|
|
|
|
Post by LittleVintageTrailer on Jun 6, 2011 7:37:38 GMT -5
He looks great!
How many inches did you end up raising the ceiling to? That was really interesting as I've never heard of it being done. I bet your hubby is happy for the standing room now.
|
|
|
|
Post by flyingham on Jun 6, 2011 14:14:13 GMT -5
Looks really good, what I like to see!
|
|
Gone Kayaking
1K Post Member
long live the Vintage Shasta Trailer Forum....we're gone but you are not forgotten!
Posts: 1,600 
|
Post by Gone Kayaking on Jun 6, 2011 14:51:11 GMT -5
LOVE IT!!!! You've given me inspiration for the last steps in phase 1 of my restoration. What did you use for the spray on the underside of the subfloor?
|
|
Hamlet
2K Post Member
Posts: 2,241
|
Post by Hamlet on Jun 6, 2011 15:31:17 GMT -5
Tweaking the ceiling height was easy. The walls were off the trailer anyway, so I traced out a piece of wood about 3 feet in length that blended in to the natural curve of the trailer to maintain the canned ham shape. I duplicated the piece so both sides were the same. We gained about 3 inches at the highest point.
|
|
Hamlet
2K Post Member
Posts: 2,241
|
Post by Hamlet on Jun 6, 2011 15:34:12 GMT -5
We used a spray-on rubberized coating on the exposed subfloor on the undercarriage.
|
|
|
|
Post by Gremlinguy on Jun 6, 2011 21:14:13 GMT -5
Looks awesome.
|
|
valewf
50 Post Member

Posts: 55
|
Post by valewf on May 29, 2012 0:10:46 GMT -5
What a cool build! I see you set up for a bathroom. Did you document the installation? Looked like a shower pan/toilet combo. Maybe 22x32?
I just bought a 61 compact and I want to install a toilet/shower combo with an on demand water heater in this small space. Is it feasible?
Thanks.
|
|
Hamlet
2K Post Member
Posts: 2,241
|
Post by Hamlet on May 29, 2012 17:28:00 GMT -5
Regarding our shower/toilet room. The closet area in the compact is the perfect size for a bathroom. There is a company that specializes in making various sized shower pans and they had one that fit perfectly. The two tiered pan we chose is 20x37. the tub part of the pan has a depth of 5 inches and is 20x 17 1/2 with a centered drain. The upper level is the perfect size for the Porto potty. I've plumbed the drain of the shower to the kitchen sink drain so that together they drain to the portable grey water tank which we keep in the bathroom when on the move. I would be happy to detail how I did this in another post if anyone was interested. Regarding the tank less water heater, it's somewhat heavy but not too heavy for this application. I've mounted it to a cross support at the front of the trailer in the bathroom which is necessary for access to the controls on the unit. Its about halfway up the wall in the bathroom. With the tank less water heater I can use either city water or pull water out of the storage tank at the back of the trailer. I've spliced into the copper tubing from the tank with a small 12v pump that can either go to the kitchen sink or the water heater. The tank less water heater is a Thretford brand heater that cost around $200 and works quite well. I hesitated a bit when I read in the instructions when it says it must be vented out of the room by 15', or something like that. In the trailer we have about 4' to work with. But I think that is a standard regulation for in the home. I've simply used a flexible 4" wide aluminum type hose to vent out to the side of the trailer. The reason venting is important is the fact that the water heater uses a lot of oxygen and so instead of sucking the oxygen out of the small room you're taking a shower in, it takes the oxygen from the out of doors. The water heater works by having a propane gas connection and has a battery operated ignition that is triggered by the flow of water. Result? Hot shower.
Two other problems I've encountered to make this whole thing work. One is the seal of the shower door, and the other, the seal of the shower pan to the wall. The door issue was cheap and simple - shower curtain. The pan to the wall was a bit more challenging because the shower pan and wall move separately from each other. I first tried silicone, but the movement of the wall when the trailer moves caused the silicone seal to fail ( Stainless steel shower stalls or plastic may be the best way to go, but I think this would be expensive and difficult to cut in). My latest solution is a putty that is used for sealing windows. It seems to adhere to the wall and shower pan and even though somewhat stiff, it seems to have enough flexibility while remaining water tight. To apply, I pressed the putty into the joint and smoothed it out so it looks good, and after two trips and several showers it seems to be working well. The walls are still birch but sealed with a marine finish and after a shower I do a quick wiping of the walls so they don't stay wet for too long just in case.
Well, that's my long winded explanation for how I managed to put in a shower in my 59 compact trailer.
|
|
|
|
Post by harrison429 on May 29, 2012 18:39:52 GMT -5
i'm glad you were asked and i got to read about your shower install...thanks for sharing
|
|
lamacki1
250 Post Member
Sundance
Posts: 434
|
Post by lamacki1 on May 29, 2012 21:49:33 GMT -5
This is the first time I'm seeing Hamlet's pics...not sure how I missed it before. Hamlet, tell your people that they did a very nice job - but of course, they were starting with a very cool trailer.
He is adorable.
|
|
valewf
50 Post Member
Posts: 55
|
Post by valewf on May 30, 2012 6:17:29 GMT -5
Thank you for the explanation/instructions on how to. Did you take any pics as you were doing this? Do you have a pic of the finished product?
Thanks again.
|
|
cowcharge
1K Post Member
I suffer from Shastasomiasis.
Posts: 1,471
|
Post by cowcharge on May 30, 2012 8:35:09 GMT -5
It sounds like you have about the same shower pan that came in my '76. In the original installation, they screwed the flange on the tub to the wall and used a gold anodized aluminum trim over it that seals to the wall above and overhangs the flange on the tub, that might be something you could add if the caulk doesn't hold up. I reused mine and sealed it with putty tape.
|
|
Hamlet
2K Post Member
Posts: 2,241
|
Post by Hamlet on May 30, 2012 10:16:59 GMT -5
The flange you described is exactly the solution I had thought about. To hear you describe it like that puts that idea back in my mind. I'll have to see if I can find some gold anodized aluminum trim, sounds like the right material for the job. The putty I used was mostly a temporary solution since I didn't have a lot of time to work on it and we just wanted to get out and camp. I think the flange connected to the wall overlapping the edge of the shower pan would allow the wall to move independent to the tub, taking the pressure off the seal. Thanks for your input. Anyway for the previous post I'll see if my wife can take some detailed pictures and post them.
|
|
cowcharge
1K Post Member
I suffer from Shastasomiasis.
Posts: 1,471
|
Post by cowcharge on May 30, 2012 10:39:27 GMT -5
It seems to be a simple, strong system. There are corner pieces that cover the joints in the corners (that I filled with caulk before screwing them on), and tub-to-ceiling corner pieces too. The tub being screwed to the wall is nice and strong, and helps prevent it being flexed, and the trim has a channel in it that sort of herds the putty tape into a gasket, and screws into the wall as well, with countersunk brass screws. This is the only pic I have of it on this laptop. I didn't find a single sign of water leakage around or under the tub when I took it apart, although the screws holding the corner pieces in were rusty. It kind of looks like the drawing in the pic, but that was drawn from (bad) memory, and I can't remember if the screws went through the channel or under it. Kind of looks like this stuff: www.all-rite.com/bt14-aluminum-molding-p-583.htmlAttachments:
|
|
boneneck
50 Post Member
1969 Starflyte
Posts: 88
|
Post by boneneck on May 30, 2012 11:26:12 GMT -5
I saw this trailer at the XXX root beer rally in May, and it is very cool. The shower where the closet was is a great idea. I also loved the fresh baked cookies that were made in the trailer, but it didn't influence my opinion. Too much. Lol!
|
|
valewf
50 Post Member
Posts: 55
|
Post by valewf on May 31, 2012 6:42:44 GMT -5
As I was sifting through the mounds of useful info on this forum I found one picture of your installation in a post from "back in the day". It showed the heater hanging on the wall and the toilet. I see some of what you were saying in your post. This is the set up that I am going to use in my 61 (I hope).
Bringing the old girl to her new home tomorrow. The fun begins then.
Thanks for the in depth explanations. I am sure that your advice will save me many dead ends and wasted money.
|
|
|
|
Post by lynettekarasz on May 31, 2012 8:01:07 GMT -5
Great job! He looks perfect!
|
|
egar
100 Post Member
Posts: 204
|
Post by egar on May 31, 2012 8:21:24 GMT -5
I needed this inspiration right now. I'm cutting ou the curvd framing. Sigh.
|
|
Hamlet
2K Post Member
Posts: 2,241
|
Post by Hamlet on May 31, 2012 21:24:03 GMT -5
Boneck - glad you liked the cookies. We wanted to show that these little guys aren't just for vintage rallies, but can be used to the fullest - we're off on another trip this weekend, in fact!
Lynette - Thanks, we think he's pretty perfect, but then we might be just a little prejudiced.
Egar - Hang in there, it's worth it!
|
|
|
|
Post by mountainkimmie on Jun 1, 2012 0:35:36 GMT -5
Really interested in the discussion about the shower since I will be re-doing the existing shower in my 16SC. I will pull the toilet and use a dry toilet system which needs no holding tank and can be set out of the shower when it is in use if desired. So I'll most likely be replacing the shower pan at some point with one that doesn't have the hole or raised area for a toilet . This will require finding the proper pan and resealing everything, so these suggestions are useful. I also think it is really cool that Hamlet's people put a shower in.
Sent from my DROID BIONIC using ProBoards
|
|
Hamlet
2K Post Member
Posts: 2,241
|
Post by Hamlet on Jun 1, 2012 9:50:11 GMT -5
One of the things we like so much about the Compact is that the closet is big enough for a toilet/shower combo. The old Airflytes, and some of the even larger models don't have room for both. And we politely decline to use a bathroom where we can't close the door. I will still occasionally use the campground bathroom, but my husband never does, and we like not having to pick a spot next to the campground restroom with its lights and activity at all hours. Luckily there are just the two of us for the most part (3 yo granddaughter will join us on occasion), since the Compact is pretty little, but having a full size bed plus bathroom, and extra closet and cupboard space makes the little trailer work really well, even for long trips.
|
|
61 Shasta
100 Post Member
Chuck's Waggin
Posts: 194
|
Post by 61 Shasta on Jun 1, 2012 10:38:04 GMT -5
Great job Hamlet.. Enjoyed your informative collage. I am nearing completion of the inside of 61 and am always looking for new idea's to finish it out. Your unit looks awesome.
|
|
|
|
Post by mountainkimmie on Jun 1, 2012 18:48:17 GMT -5
Hamlet, I looked at a 69 Airflyte that had a lovely little closet, but it would not have been large enough by itself for a shower. I would have had to canibalize the area next to it that contained a half-sized wardrobe above with a couple of drawers below with the furnace in the bottom portion. It would have been do-able, and a clever builder might even have managed to fit a tiny, narrow cupboard alongside, but it would have been a shame to lose the original wardrobe and drawers. The same is true of the 1400. I had seriously considered getting a 1400 instead of a 16sc if I couldn't find one, and just building out a bathroom. But I really wanted to have the storage space and not have to go to the extra expense and effort of building out a shower, so I knew what I really wanted was the 16sc. If you've got room for *both* a bathroom and closet in little Hamlet, you are blessed indeed (or maybe just clever designers!).
|
|
Hamlet
2K Post Member
Posts: 2,241
|
Post by Hamlet on Jun 1, 2012 21:05:23 GMT -5
I saw your 16SC - wonderful layout, Kadydid (or is she Katydid, like the bug?)will be gorgeous! If someone gutted and redid an Airflyte, there would be plenty of room for a bathroom at least as big as a Compact's, but the front dinette, side kitchen isn't as conducive to a change. All we did with Hamlet was re-think the bed situation (my hubby is the genius), and the resulting "extra" storage space has been wonderful. But you won't have to change a thing, somebody already thought yours out!
|
|
|
|
Post by mountainkimmie on Jun 1, 2012 23:19:35 GMT -5
Kadydid with a D. The train of thought behind that is KD (for Kimmie dream which is what my camping buddies have been calling it) leading to Kady. Soup feels it should be Kadydid, and it works for me. Kimmie had a dream and she did it. Collaborative naming. Sometimes it takes a village.
Sent from my DROID BIONIC using ProBoards
|
|