|
|
Post by bretso on Sept 22, 2011 12:21:37 GMT -5
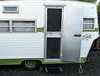
Well... I've found the dreaded dry rot monster underneath my rear wall paneling. It's only a small chunk of frame that is effected so I feel pretty fortunate. I only need to replace about half the length of the framing piece directly under the rear window. I think I can use a dremel or something to slice that part of the board out and kraig jig a new piece back in. My questions are; 1) Should I add bracing of some kind to support the wall and window while I make the repair? I was thinking of attaching two supports (green bars in the attached photo) to assist while I'm doing the surgery. Is this a good idea? Is there a better way? Replace the whole board instead of just the rotten part? Any suggestions would be greatly appreciated. 2) should I try to repair the leaky window corners now (remove and replace window with new tape to seal it up) or fix the framing and then work on the leak? I was hoping to to this all from the inside with the skin on since it's such a small repair. I hurt my shoulder scrambling away from the hornets that like my Shasta so I'll be out of commission for a little while. The up side is that it gives me time to plan my attack on the rear wall framing. Thanks in advance. Attachments:
|
|
Gone Kayaking
1K Post Member
 long live the Vintage Shasta Trailer Forum....we're gone but you are not forgotten!
Posts: 1,600 
|
Post by Gone Kayaking on Sept 22, 2011 14:14:39 GMT -5
Bracing yes
I would put in new boards and otherwise beef up the old framing. Many add addtional cross pieces (vertical and lateral).
Yes you should take out the windows etc......I would say to do so before you replace the framing but could do either way.
seems like skin on is fine.
Shoulders are a pain, hope you are recovered soon.
|
|
Bob
250 Post Member
 Pictures are still on my blog: thisoldcamper.com
Posts: 375
|
Post by Bob on Sept 22, 2011 14:58:42 GMT -5
If you have the interior panel off, I'd replace the whole length of framing. If you only replace the rotten part, I suggest a half lap joint with glue and screws and put your extra bracing under the joint. I added a vertical framing piece when I rebuilt the rear wall (see before and after pictures). The framing on the curb side was discolored but still solid, everything else was trashed.
You need to take the window out because it's screwed into what you need to replace. Also, the aluminum skin is stapled to the window framing, so before you can replace the wood, you have to get all those screws and staples out of the way. Once you get good framing, then you can replace the windows with new butyl tape. Good luck.
|
|
|
|
Post by bretso on Sept 22, 2011 15:38:27 GMT -5
Thanks so much for your replies!
Potomac - your water damage photos look very similar to mine. I'll use yours as a guide. If I have to remove the window I might as well replace the entire length of frame below it. I should have thought of that... duh.. the window has to be attached to something. (maybe I injured my brain along with my shoulder ;D)
I have a really good excuse to buy a lot of stainless screws now.
|
|
Bob
250 Post Member
Pictures are still on my blog: thisoldcamper.com
Posts: 375
|
Post by Bob on Sept 22, 2011 18:48:25 GMT -5
I bought 500 SS screws and have about 30 left. I replaced the screws on the door, windows, hatches and vents. I re-used the best old screws when I re-did the J channel. Its amazing how many screws there were. I also used a cordless drill with torque settings on it and drove the screws in easy at first and hand ratcheted them tight once I got them all in at each window. You get a better feel for how tight is tight enough without spinning the hole out.
|
|
Gone Kayaking
1K Post Member
long live the Vintage Shasta Trailer Forum....we're gone but you are not forgotten!
Posts: 1,600
|
Post by Gone Kayaking on Sept 22, 2011 22:47:03 GMT -5
only 500....at last count I was up to 800!
|
|