|
|
Post by neophyte on Sept 27, 2012 22:34:20 GMT -5
We have a 1966 Shasta 1500. As of noon today, we have completed a total frame off. The frame is quite rusty but has no obvious defects. We have replaced the wheel bearings. We plan to replace all of the supporting frame members and put in a new floor. We would appreciate any feedback from you on our plan of action. Do you think we are missing anything? What advice do you have for us? We got a quote today for sandblasting the entire frame, axle, drums, and wheels for $105. The guy is retired and does this on the side. He comes highly recommended from several auto body shops who subcontract work to him. We trust him. We have also priced the prime coating to be done by a small auto body shop on all of the freshly cleaned metal with an acid etch primer. The price quote is $150. We plan to apply a rubberized paint as an undercoating underneath the entire trailer on all of the non-visible parts. We will then choose an appropriate color for all visible parts after we have finalized our trailer colors. Does this price seem reasonable? He does high quality work and can paint it right after it gets sand blasted. He also has expertise in restoring old tractors. He does beautiful work and has used this same primer many times with good results. We are also contemplating several more modifications to our frame before the painting. 1. We want to move the axle from above the springs to below them. It will change the ground clearance of the trailer by about 4 inches. We have seen several of the forum members do this. We need it to be able to get in and out of our driveway. He has quoted us a price of $100 for all labor and materials. Has anyone done this and then been sorry that they did it? 2. We are also contemplating adding 2 more 1.5" angle iron crossbars to help strengthen the frame and reduce some of the trailer's flex. Right now, we only have 3 crossbars. One new piece will be in the front of the trailer on the right side of the door opening. The other one will be toward the back near where the bumper is attached. Each bar will add 8 to 10 pounds and have an installed total price of $32 for material and labor for each I have seen these two extra crossbars on slightly bigger trailers. It seems to me that it would be worth the cost and weight to have this done. 3. Lastly, our rear bumper is like a piece of heavy sheet metal. (photo below) (Quite easy to twist and bend.) We are wondering if we should change this out to a piece of heavier gauge channel iron. We have been quoted a price of $50 for labor and materials for beefing this up. It will also add an additional 30 to 40 lbs. We are looking forward to hearing your responses. Attachments:
|
|
vikx
3K Post Member

Posts: 3,556
|
Post by vikx on Sept 28, 2012 1:01:34 GMT -5
You have certainly thought out your plan and I'm impressed!
First of all, on the frame, have you considered POR 15? Very good reports on it. Takes care of rust and doesn't need a primer. Tough as nails.
1. Our Bellwood had the axle flipped on the high side. We lowered her back down and enjoy the look. She's a ground hugging canned ham now.
2. This idea is excellent! I've added several cross members; one at the back of our LoFlyte, another on the Aristo Land Commander. Really helps strengthen the frame. Maybe place the back brace midway between the back most cross member and the bumper.
3. We're going to change one of our bumpers out to channel iron. Wish it was only going to be 50 bucks here...
Try to keep added weight equalized and within a 100 pounds or so. Sounds like you are doing that. Also, check the frame carefully for cracks, especially at the curves toward the A at the tongue.
Post pix and results! VK
|
|
|
|
Post by neophyte on Sept 28, 2012 17:40:15 GMT -5
Thanks for your advice! We really appreciate it! Here is a picture of what we are contemplating with the axle. We dragged our frame to two more body shops this morning. Their bids were all higher. We are so fired up to really get this project started! We also dropped off our wheel wells to get repaired ($35) Attachments:
|
|
|
|
Post by neophyte on Sept 28, 2012 17:43:05 GMT -5
Here is a better picture of the frame and the proposed crossbars. Attachments:
|
|
Hamlet
2K Post Member
Posts: 2,241 
|
Post by Hamlet on Sept 28, 2012 19:47:02 GMT -5
After spending several freezing days chipping, sanding, and chemically removing the original coating on the frame, we decided that if we ever do another restore, we will definitely have the darn thing sandblasted.
|
|
|
|
Post by neophyte on Sept 28, 2012 21:57:25 GMT -5
Confirmation helps more than you know. I was really getting into the power of a wire wheel on my drill while uncovering the Vin# on the frame back in June. That effort for one spot, the temperatures dropping and the loss of our barn space is a new equation. $$=MC2
|
|
Hamlet
2K Post Member
Posts: 2,241
|
Post by Hamlet on Sept 29, 2012 0:39:38 GMT -5
I think that was Einstein's original equation! (Aside from that, ylu'd probably spend $150 on the dang wire wheels AND need a new drill after you burned one out!)
|
|
Gone Kayaking
1K Post Member
long live the Vintage Shasta Trailer Forum....we're gone but you are not forgotten!
Posts: 1,600 
|
Post by Gone Kayaking on Sept 29, 2012 21:46:58 GMT -5
I did the axle flip you are talking about and didn't notice any change in handling, and now I can also get in and out of my driveway without scraping at least most of the time. I have a 1956 1500. It didn't make 4 inches of difference though just 2.5....which was perfect in my case. 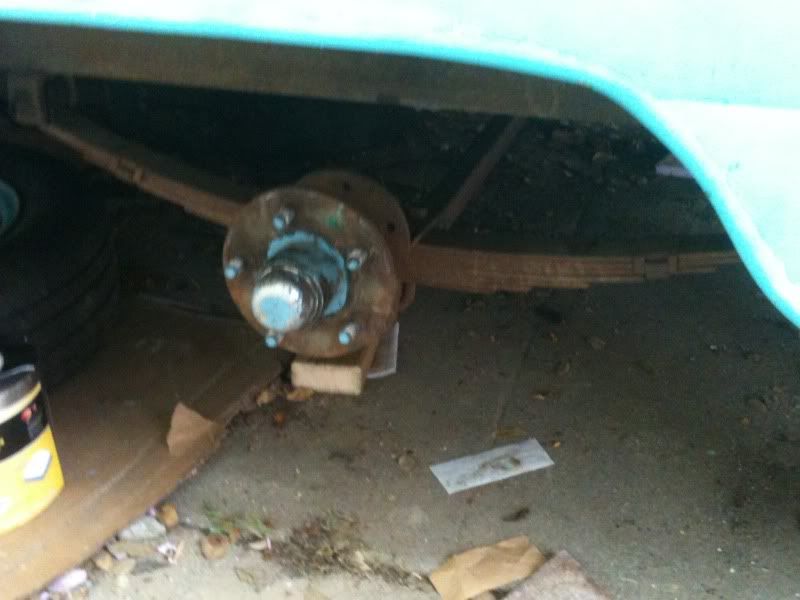 |
|
|
|
Post by neophyte on Oct 1, 2012 8:23:21 GMT -5
GoneK-Did you have your springs disassembled and cleaned? Did you have a block that was welded on the springs to the axle that needed to be put on the other side? We've been told to leave the one that is on and just add another when we move it. A hotrodder suggested we get new springs because of age, even though the frame guys (several different ones) have all said they are good, (good and rusty). Saw the link here with pictures of them desassembled and cleaned. WOW.
|
|
|
|
Post by kto17 on Oct 1, 2012 11:13:45 GMT -5
Unless springs are brittle, they can be re-arched. In the process they take them apart clean them up and repaint. I had a shop near Atlanta do some for a truck I had and it was $60 a side, or $120 for the pair.
You could try that before the flip.
|
|
|
|
Post by schweetcruisers on Oct 1, 2012 14:42:14 GMT -5
I think I paid 40 bucks per side for my new springs.
|
|
|
|
Post by neophyte on Oct 2, 2012 22:10:14 GMT -5
Sandblasting done! 1000 lbs. of sand and 4 hours of labor. I can't imagine how long it would have taken us with our drills and wire brushes. Attachments:
|
|
|
|
Post by neophyte on Oct 2, 2012 22:20:38 GMT -5
One more picture. We had the wheels done too. Pictures are taken in front of the paint shop. Now we will add two more crossbars and a new rear bumper. Then it all gets painted with 2 to 3 coats of acid etch primer. . We really want to thank everyone who responded to our plan. We'll send updated photos after the prime coating is done. Attachments:
|
|
Gone Kayaking
1K Post Member
long live the Vintage Shasta Trailer Forum....we're gone but you are not forgotten!
Posts: 1,600
|
Post by Gone Kayaking on Oct 2, 2012 23:16:31 GMT -5
Looks like you've opted not to flip the springs.
Well you are just zipping along! I did not do a frame off, and was also told my springs were okay if a bit rusty. I opted to leave them be. I had a friend do it, and I know that he had to do something mid way through that he wasn't expecting that involved drilling a hole in a plate...so maybe....looks like you are well beyond the need for my answer.
I sometimes wish I had done the full frame off. but it just wasn't in the cards. I have thoughts about going at the frame from the bottom, if I can find someone with a rack they'll let me use over a weekend. At least wire brush all the rust and hit it with rust reformer and a top coat.
|
|
|
|
Post by neophyte on Oct 3, 2012 17:23:27 GMT -5
We ARE going to move the axle below the springs too. We will be doing that when we add the additional crossbars and the rear bumper. Sorry we omitted that part. Thanks for your advice and encouragement! We have learned a lot from you! P.S. We didn't plan on a total frame-off either! 1st Lesson Learned: Check for rot first, BEFORE you buy that bargain trailer!  |
|
Hamlet
2K Post Member
Posts: 2,241
|
Post by Hamlet on Oct 3, 2012 21:02:49 GMT -5
neophyte - Awww, what's the fun in that?
|
|
|
|
Post by neophyte on Oct 25, 2012 19:54:36 GMT -5
Hi all! Here is a picture of the sandblasted and primed frame. We have labeled the two new angle iron supports and new bumper. We have also made new wood frame members that will support the new floor. We are starting to see some progress now. My husband has until Sunday to finish the wheel wells and Floor. I want my garage back! (AND our cars inside for Halloween! ) Attachments:
|
|
|
|
Post by neophyte on Oct 25, 2012 20:14:21 GMT -5
Here is another picture from the front curbside. We decided to add two additional wood framing members. One for extra support for the floor in the doorway area and one on the other side to support either the new water tank OR the batteries for our new electrical system. Decisions, decisions! Attachments:
|
|
|
|
Post by neophyte on Nov 4, 2012 13:25:15 GMT -5
Not sure if anyone is still following this link, but we'll keep posting our progress. I am neophyte's husband, Phil. I'm 6' 4'' and weigh more than 240 pounds. The more I looked at our new plywood floor, the more I felt it needed additional support in the doorway area and the center section of the floor. I can only use 1/2 inch plywood so that it will still match up with the old skin. Here is a picture of the additional wood framing members that will be supporting the floor. We've added a total of 42 additional pounds of weight with the 2 new angle iron metal crossbars, the new bumper, and the additional wood frame members. I am hoping that this will serve as a good foundation for our "NEW" old trailer. Attachments:
|
|
|
|
Post by rattbyte on May 21, 2013 17:48:09 GMT -5
Howdy Campers!
Wow, neat info. I need to redo the frame on my 1967 1500. First clue: while loading on to flatbed, rear bumper and 1/4 of frame falls off!.
Big question to both Vikx and Neo, how the heck to you get the body off the frame. Not sure how body is attached to frame. Mobiltec says screwed from side (not down thru floor) of frame, but I can't see this/not sure how to look (peel up skin all around?)
Have a barn with a hayloft winch rated at 3,000 lbs. Just need to lift a couple of inches and have a car restoration cart I can set body back on after pulling frame out.
Just need to figure out how to get body off and up in the air 2" (after removing interior and running cross braces inside where floor would go).
Thoughts?
|
|


