Post by Redwings on May 5, 2011 22:02:46 GMT -5
I've had a few inquiries into how I sewed my own awning for my Compact. I made mine for under $50 (Hey! The $50 Awning Job!) and have written down a tutorial. It helps if you can get the awning fabric on sale. I didn't buy the Sunbrella fabric but rather used a nice awning canvas purchased at JoAnn fabric. They frequently have 50% off coupons which makes a good savings when the fabric is $15-$20/yard and you need 7 plus yards of it). Also, make sure you use a high quality and sturdy thread for the job. I sewed this just using my cheap $150 Singer so you don't need a heavy duty machine.
Measure the width of your awning rail. I made my awning two inches shorter than the awning rail so I could whittle down wine corks to plug up the ends to keep the awning in the rail during high wind weather.
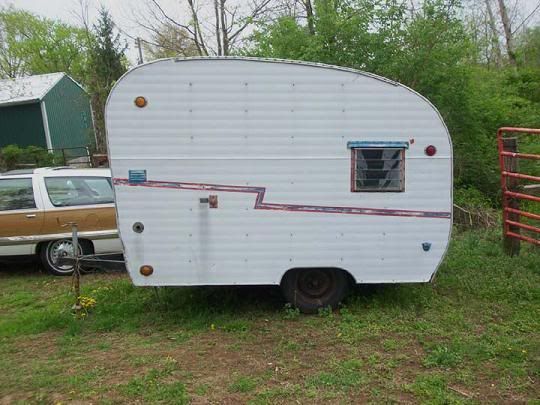
Determine how far out in front of your trailer you want your awning to go. I chose 7 feet and have been quite happy with that but I have seen much longer ones for sale. I think it depends on the size of your trailer and how much shade you want. The 7 feet works perfect for my little Shasta compact.
Cut your fabric to the measurements you’ve decided, making sure to leave seam width allowances. Since my fabric wasn’t wide enough to make the width I had to use two lengths of 7 feet each and sew them together in the middle. Example: My awning rail was 84 inches wide. My fabric was only 50" wide. I cut two 7 foot long pieces at 42 inches wide each and sewed them together with a middle seam using 1/2" seam allowance.
Sew the middle seam using a french seam (where you sew it once wrong sides together 1/4”, then encase the seam by sewing another seam, but right sides together 1/2). Here’s a website that gives good directions for this:
www.sewneau.com/how.to/french.seam.html

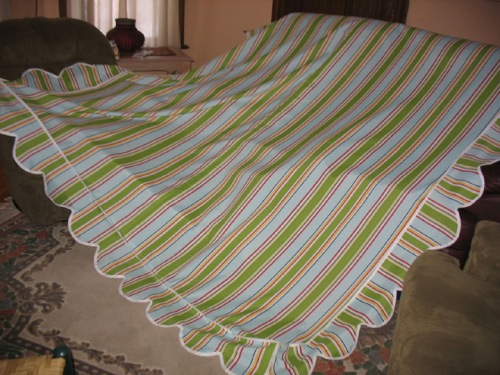
Cut the scalloped skirt (this addition is optional but it sure makes the awning look vintage and cute!). I cut mine 7 1/2” x the length of the awning (7 feet). Fabricate two of these--one for each side. Then cut one more to go along the front of the awning..whatever width you have chosen. You may have to join pieces like mentioned above (french seam) to make the width and lengths needed. I made sure that my stripes were vertical on all 3 sides as this was the way vintage ones were made. For the scallop edges I found a plate with a diameter of 7 1/2 inches and traced the half-round scallops along the bottom edge of the skirt. I’m kind of a perfectionist so I fussed around with the plate until I was sure I would have a complete scallop at each corner edge (where the sides meet the front).

Bind the scallop skirt: Using white seam binding tape (double fold bias tape 1/2”) and using a zig zag stitch stitch the binding tape to the scalloped edge of the skirt starting at the upper back edge (the edge that will be next to the trailer) . Do not apply the binding tape to the front corner sides of the skirt. These are the edges of the skirt that will meet up in the front to form the side and front corners. So, for the front skirt you won’t sew the binding up the outside edges of the skirt but will start at the beginning of the curved scalloped. You will stitch the seam binding on the corners after you sew the corner seams together. This I had to fuss around a bit to figure out how to do it, and I came up with this. I’m sure if you figure out a better way it would work too!

Stitch the front skirt onto the front of the awning with wrong sides together and using 1/4” seam allowance. Next encase this seam with seam binding tape and sew it using a large zig zag stitch. This gives you a double seam and I think adds more strength to the awning.
Stitch each side of the skirt to the sides of the awning in same manner as front (1/4” seam). Stitch the two corner seams together using 1/4” seam allowance). Now sew on the seam binding tape using a large zig zag stitch starting at the back (trailer end) of the seam and wrapping the tape around the front corner seam ending at the front lower edge of the corner of the awning. Again, if you fuss around and find a better way to do this...all the better!
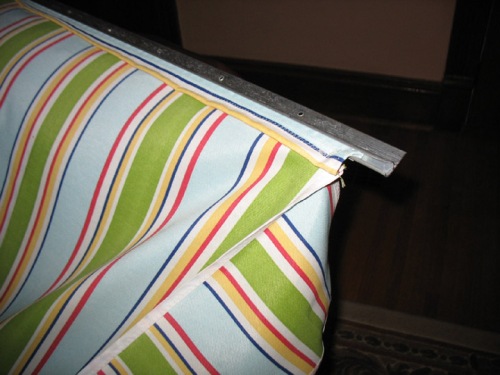
Now comes the hard part--sewing a cable or rubber tube into a length of folded over awning material, and then stitching it to the back of the awning (the trailer side). I measured the diameter of my awning rail opening (it was 1/2”) and went to my local hardware/feed store (Big R) and bought rubber-wrapped twisted airplane cable the exact length I needed to feed into the awning rail (2 inches shorter than the awning rail). This stuff is a bugger to cut so it’s best to have them cut it to the exact length you need. I think I bought 3/8” and knew that when I wrapped my material around it it would fit snugly into the awning rail opening which is 1/2". You don’t want it too snug as you will be struggling to get the dang awning threaded in. You also don’t want it too loose as then you will be constantly fighting it to stay in (unless you do the wine cork trick I mentioned above! One for each side. Guess that means you have to drink two bottles of wine...shucks!)
Place the cable or tube on a length of awning fabric two inches longer than the cable or tube and three inches wider than the cable or tube. Fold over the top edge of the fabric to meet the bottom edge. Using a zipper foot sew the cable or tube snugly into the fabric, not unlike sewing a cord to make fancy upholstery binding. At the ends of the cable/tube fold over each end of the fabric twice to completely enclose the ends and stitch these down. This will keep the cable or tube securely in place and it is now completely encased!

To make a finished edge on this tube thing (long edge) fold under the awning fabric 1/2” once and stitch this under. This still leaves about an inch with which to sew the cable/tube contraption to the back of the awning. When you sew this onto the back of the awning make sure it sticks out far enough like a flap that you can slide it into the awning rail.

Another BETTER option is to buy Keder Awning Rope from Sailrite. Then you just sew this rope onto the edge of your awning and it slides into your awning rail.
Lastly, set in place two grommets as close to the front corner edges as possible. Make sure these grommet holes are large enough to accommodate the awning poles you have chosen, but not too large that the poles swim in them. (I sewed in two squares to reinforce each corner edge before I placed the grommets.) I purchased the grommets and tools at my local fabric store and they were pretty inexpensive and easy to affix.


I went to Wal Mart and bought the telescoping Coleman tent poles, but I’ve read on the forum that these aren’t as strong as others available. I couldn’t beat the price ($10 each) and since my trailer and awning is fairly small they work ok. But I can see the advantage to having stronger poles--especially in windy times! I once had to get up at 1 am to rescue my awning which had loosed itself and was hanging half off the rail. (Needed stronger corks)
Hope this helps and isn't too confusing. I'm not stellar at giving directions or instructions so with luck I haven't forgotten a step! I am willing to answer any questions anyone may have. Just e-mail me.

Diane
Measure the width of your awning rail. I made my awning two inches shorter than the awning rail so I could whittle down wine corks to plug up the ends to keep the awning in the rail during high wind weather.
Determine how far out in front of your trailer you want your awning to go. I chose 7 feet and have been quite happy with that but I have seen much longer ones for sale. I think it depends on the size of your trailer and how much shade you want. The 7 feet works perfect for my little Shasta compact.
Cut your fabric to the measurements you’ve decided, making sure to leave seam width allowances. Since my fabric wasn’t wide enough to make the width I had to use two lengths of 7 feet each and sew them together in the middle. Example: My awning rail was 84 inches wide. My fabric was only 50" wide. I cut two 7 foot long pieces at 42 inches wide each and sewed them together with a middle seam using 1/2" seam allowance.
Sew the middle seam using a french seam (where you sew it once wrong sides together 1/4”, then encase the seam by sewing another seam, but right sides together 1/2). Here’s a website that gives good directions for this:
www.sewneau.com/how.to/french.seam.html

Cut the scalloped skirt (this addition is optional but it sure makes the awning look vintage and cute!). I cut mine 7 1/2” x the length of the awning (7 feet). Fabricate two of these--one for each side. Then cut one more to go along the front of the awning..whatever width you have chosen. You may have to join pieces like mentioned above (french seam) to make the width and lengths needed. I made sure that my stripes were vertical on all 3 sides as this was the way vintage ones were made. For the scallop edges I found a plate with a diameter of 7 1/2 inches and traced the half-round scallops along the bottom edge of the skirt. I’m kind of a perfectionist so I fussed around with the plate until I was sure I would have a complete scallop at each corner edge (where the sides meet the front).

Bind the scallop skirt: Using white seam binding tape (double fold bias tape 1/2”) and using a zig zag stitch stitch the binding tape to the scalloped edge of the skirt starting at the upper back edge (the edge that will be next to the trailer) . Do not apply the binding tape to the front corner sides of the skirt. These are the edges of the skirt that will meet up in the front to form the side and front corners. So, for the front skirt you won’t sew the binding up the outside edges of the skirt but will start at the beginning of the curved scalloped. You will stitch the seam binding on the corners after you sew the corner seams together. This I had to fuss around a bit to figure out how to do it, and I came up with this. I’m sure if you figure out a better way it would work too!

Stitch the front skirt onto the front of the awning with wrong sides together and using 1/4” seam allowance. Next encase this seam with seam binding tape and sew it using a large zig zag stitch. This gives you a double seam and I think adds more strength to the awning.
Stitch each side of the skirt to the sides of the awning in same manner as front (1/4” seam). Stitch the two corner seams together using 1/4” seam allowance). Now sew on the seam binding tape using a large zig zag stitch starting at the back (trailer end) of the seam and wrapping the tape around the front corner seam ending at the front lower edge of the corner of the awning. Again, if you fuss around and find a better way to do this...all the better!
Now comes the hard part--sewing a cable or rubber tube into a length of folded over awning material, and then stitching it to the back of the awning (the trailer side). I measured the diameter of my awning rail opening (it was 1/2”) and went to my local hardware/feed store (Big R) and bought rubber-wrapped twisted airplane cable the exact length I needed to feed into the awning rail (2 inches shorter than the awning rail). This stuff is a bugger to cut so it’s best to have them cut it to the exact length you need. I think I bought 3/8” and knew that when I wrapped my material around it it would fit snugly into the awning rail opening which is 1/2". You don’t want it too snug as you will be struggling to get the dang awning threaded in. You also don’t want it too loose as then you will be constantly fighting it to stay in (unless you do the wine cork trick I mentioned above! One for each side. Guess that means you have to drink two bottles of wine...shucks!)
Place the cable or tube on a length of awning fabric two inches longer than the cable or tube and three inches wider than the cable or tube. Fold over the top edge of the fabric to meet the bottom edge. Using a zipper foot sew the cable or tube snugly into the fabric, not unlike sewing a cord to make fancy upholstery binding. At the ends of the cable/tube fold over each end of the fabric twice to completely enclose the ends and stitch these down. This will keep the cable or tube securely in place and it is now completely encased!

To make a finished edge on this tube thing (long edge) fold under the awning fabric 1/2” once and stitch this under. This still leaves about an inch with which to sew the cable/tube contraption to the back of the awning. When you sew this onto the back of the awning make sure it sticks out far enough like a flap that you can slide it into the awning rail.

Another BETTER option is to buy Keder Awning Rope from Sailrite. Then you just sew this rope onto the edge of your awning and it slides into your awning rail.
Lastly, set in place two grommets as close to the front corner edges as possible. Make sure these grommet holes are large enough to accommodate the awning poles you have chosen, but not too large that the poles swim in them. (I sewed in two squares to reinforce each corner edge before I placed the grommets.) I purchased the grommets and tools at my local fabric store and they were pretty inexpensive and easy to affix.


I went to Wal Mart and bought the telescoping Coleman tent poles, but I’ve read on the forum that these aren’t as strong as others available. I couldn’t beat the price ($10 each) and since my trailer and awning is fairly small they work ok. But I can see the advantage to having stronger poles--especially in windy times! I once had to get up at 1 am to rescue my awning which had loosed itself and was hanging half off the rail. (Needed stronger corks)
Hope this helps and isn't too confusing. I'm not stellar at giving directions or instructions so with luck I haven't forgotten a step! I am willing to answer any questions anyone may have. Just e-mail me.

Diane


