|
|
Post by staryn on Feb 15, 2010 19:37:42 GMT -5
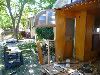
As I try to restore the front end of a '58-'60 Shasta Airflyte I find myself wondering how it was built. The more rotted wood I remove the more I find so I am having to deal with the nails put in from the outside, the side paneling having to be removed before the ceiling paneling, and now I am down to the piece of frame at the bottom of the wall that is screwed into the larger sub flooring beams. What intrigues me is that the order of material from the sub floor wooden beam out goes like this: sub floor beam, 1/8" birch panel, 3/4" x 1 3/4" wood base, aluminum exterior skin. How did they get the 1/8" birch panel in between the wood base and the sub floor beam unless they assembled the walls with the skin on them and then attached them to the rest of the frame? Any ideas? Even if not, are there any tips for replacing the piece of wood frame that the bottom lip of the aluminum skin is nailed to?
|
|
|
|
Post by staryn on Aug 8, 2010 23:16:49 GMT -5
A simple answer to my final question was to unfasten the siding and peel it up, then replace all the rotten wood beneath it. This would be a good time to mention that many posts do not recommend using treated lumber as it is likely to corrode the aluminum. I suppose I will find that out in time.
|
|
joek
250 Post Member
 Inside Out
Posts: 324
|
Post by joek on Aug 9, 2010 1:11:27 GMT -5
I believe the walls were built on the ground. The frame was built, then they nailed the birch on. The walls then went onto the trailer frame, nailing straight through the bottom plate into the wood floor. Once the walls were up, then the cabinetry and appliances went in. After that the roof, front and back birch went on, followed by the plywood strips and the then the roof spars. Follow that with aluminum, some paint, install the windows and doors and hit the road. In a nutshell anyway.
|
|