embee
New Member
Posts: 37
|
Post by embee on Jul 11, 2012 22:10:17 GMT -5
The more I read these posts, the more of a newbee I realize I am. My confidence in getting our dinette windows in correctly and well-sealed is shaky. I finally think I understand how they go together, but after rebuilding the framework, things are somewhat out of whack. Actually, I think they were out of whack before. There was so much gunk (butyl, silicone, liquid nails) it was impossible to know for sure.
We're not ready to put glass back in place yet, but when we do, I'll be reading this thread again. Thanks, Everyone, for your valuable input.
|
|
Gone Kayaking
1K Post Member
 long live the Vintage Shasta Trailer Forum....we're gone but you are not forgotten!
Posts: 1,600 
|
Post by Gone Kayaking on Jul 11, 2012 22:24:05 GMT -5
Embee--no worries....worst case...you'll do everything else and then pay someone to do that last part. It can pretty much wait till the last. In fact, we did our whole 6000 mile road trip with one of these windows boarded up because I was tired of fussing with it and wasn't willing to wait to get on the road. THE PERFECT IS THE ENEMY OF THE GOOD. And the good in my case at least is camping, not fussing!
|
|
embee
New Member
Posts: 37
|
Post by embee on Jul 12, 2012 18:49:25 GMT -5
Thanks for the encouragement, GK...I think. I have spoken to a local RV repair shop and a windshield repair shop. One recommended silicone (really), the other black urethane in a tube. Both thought that putting the VTS sealer strip in would compromise the seal. So, who do I believe?
|
|
|
|
Post by schweetcruisers on Jul 12, 2012 20:51:58 GMT -5
Windshield replacement shops only know how to install glass one way, with a massive bead of black goop made by 3m.
Most modern RV shops don't understand, care or know how to work on our trailers, hence slop some silicone on it, and if that doesn't work put some more silicone on it!
|
|
Gone Kayaking
1K Post Member
long live the Vintage Shasta Trailer Forum....we're gone but you are not forgotten!
Posts: 1,600
|
Post by Gone Kayaking on Jul 12, 2012 20:52:12 GMT -5
geeesh, there is a special windshield silicone that Vikx mentions above so maybe that's what they were talking about?? VikX is kind of my bible, so.... As for the black (or grey or whatever) urethane...it's something like that you use with the seal .....so maybe they are both right. If they'll both stand behind their work pick the one that you trust the most. By the way ....where are you? Perhaps we can poitn you in the direction of a good restore person.
|
|
embee
New Member
Posts: 37
|
Post by embee on Jul 13, 2012 16:18:08 GMT -5
I made a crude sketch of how I hope these dinette windows install. This is supposed to be a cross-section view. This is what I picture from Vikx's description. Someone please tell me if I have something wrong. The little gap under the screw, between the skin and frame is for illustration purposes. I expect it should be closed when the screws are tightened, although that Hehr glass seal does require space. This helps me (if I have it correct). Maybe it will help someone else, too. You all have been so much help. Thanks! Attachments:
|
|
embee
New Member
Posts: 37
|
Post by embee on Jul 13, 2012 16:20:21 GMT -5
Oh, and I assume that small bead of silicone (or whatever sealer) goes just above the screw, and maybe under the Glass Seal? I see why these things are so hard to seal....
|
|
vikx
3K Post Member
Posts: 3,556
|
Post by vikx on Jul 14, 2012 1:29:45 GMT -5
You got it Embee! It's not the best design... LOL.
I use clear glass sealant to help stick the seal to the metal. It's a clear thin substance and dries very quickly. Just a very thin layer.
And yes, the thin silicone goes just above the screw. It's dicey to keep it small and under control, and I hope it seals.
The "stick" is a little taller than your drawing, approx. 3/4" That gives the glass a little more support.
Careful! tightening the screws. Have had more than one Shasta owner in a bad mood over broken glass...
By the way: I learned from the local glass lady on their seal tape for some of our solid windows. (double sticky dense foam) She told me to spray window cleaner on it before setting the glass, that allows adjustments. Thank you Glass Lady!!!
|
|
|
|
Post by avannoy on Jul 14, 2012 21:33:52 GMT -5
I made a crude sketch of how I hope these dinette windows install. This is supposed to be a cross-section view. This is what I picture from Vikx's description. Someone please tell me if I have something wrong. The little gap under the screw, between the skin and frame is for illustration purposes. I expect it should be closed when the screws are tightened, although that Hehr glass seal does require space. This helps me (if I have it correct). Maybe it will help someone else, too. You all have been so much help. Thanks! Somebody correct me if I'm wrong, but the hehr seal does not go between the skin and the framing. The skin sticks up beyond the edge of the framing and the seal just slips over the skin. Here is a drawing DH drew. Attachments:
|
|
|
|
Post by universalexports on Jul 22, 2012 22:52:51 GMT -5
not sure how this was done, but it looks like different stuff, this is Mr USA's Shasta on the Vintage Shasta club in yahoo. 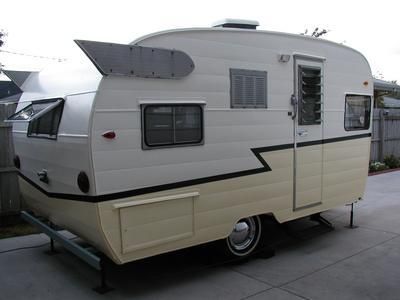 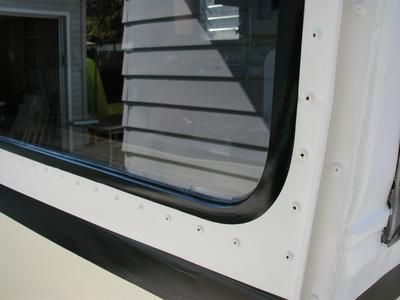 |
|
Gone Kayaking
1K Post Member
long live the Vintage Shasta Trailer Forum....we're gone but you are not forgotten!
Posts: 1,600
|
Post by Gone Kayaking on Jul 23, 2012 11:41:46 GMT -5
Let me try to get this straight. We shouldn't have a bunch of incorrect diagrams around. Here's what I think is correct. Comments are welcomed! Embee your attachment didn't work. I think Avannoy is correct but the scale is off which makes it look a little funny. Embee you have the process correct though. The seal is not very wide so it rests over the skin and against the glass but slightly above the framing--at least that's how it is on mine as shown in avannoy's pic. The screws that go around the window are considerably into the framing around the window, and with the sealant placed VikX describes. |
|
|
|
Post by kto17 on Jul 23, 2012 16:22:52 GMT -5
not sure how this was done, but it looks like different stuff, this is Mr USA's Shasta on the Vintage Shasta club in yahoo. I'm watching this one closely.... Off Topic, I know thats a pre 1960 but I don't recall seeing a window in a door. Looks nice for a custom job. Looks like a (streetside) kitchen window. |
|
embee
New Member
Posts: 37
|
Post by embee on Jul 29, 2012 19:51:44 GMT -5
I hope this drawing works. We shouldn't have a bunch of incorrect diagrams around. Here's what I think is correct. Comments are welcomed! Some pics of the one window I installed today in following posts. Attachments:
|
|
embee
New Member
Posts: 37
|
Post by embee on Jul 29, 2012 20:04:06 GMT -5
Well, now it's almost too small to see... During installation, I felt strongly that all those screws around these windows are leak sources. So, I slipped a strip of butyl tape between the skin and frame. Then installed the Hehr seal strip. I applied a thin bead of Permatex silicone to the flat, inside of the strip, then placed the glass. I predrilled the 'sticks' (1/4" x 3/4"--as thick as would fit the metal frame). Everything seemed to fall right into place, tightly, and cleanly. Pics follow, if I can get them to work... This is looking straight down onto the lower edge of the window. Attachments:
|
|
embee
New Member
Posts: 37
|
Post by embee on Jul 29, 2012 20:06:38 GMT -5
After snugging the screws down on that butyl (not too tight yet), I applied the Hehr seal and siliconed the inside edge (lightly). Attachments:
|
|
embee
New Member
Posts: 37
|
Post by embee on Jul 29, 2012 20:08:07 GMT -5
Next, the glass, up against the Hehr seal, and then I screwed the sticks against the glass. Attachments:
|
|
embee
New Member
Posts: 37
|
Post by embee on Jul 29, 2012 20:09:49 GMT -5
Last photo is the outside view. I did install the metal framework inside, didn't get photos. The pieces were not in great shape....take my word for it. Looks good from the outside, though! Attachments:
|
|
|
|
Post by hueytownalss on Aug 10, 2012 1:06:03 GMT -5
Havent gotten all my seals for windows yet. VTS had a couple of them back ordered. Havent had time to work on new design yet either because of surgeries for the wife. Back on this project soon. VTS has the seals in and wife is healing.
|
|
|
|
Post by Hugh Currin on Nov 8, 2012 12:46:44 GMT -5
I've been thinking of this dinette window dilemma for several years. All the posts here make sense and I keep learning from them, thanks.
I finally took the leap and put our dinette windows back in. Two changes were made from the original. First, the framing was expanded to leave some room for a bead of sealant directly between the aluminum skin and glass. If a good seal is maintained here the rubber seal is only decorative. The second change was to use a foam backer rod to press the glass out against the seal.
I wrote up a web page describing this at "www.currin.us". Ours is still up on blocks so I don't know if it works or not, but it looks promising.
Thanks.
|
|
Deleted
Deleted Member
Posts: 0
|
Post by Deleted on Jan 19, 2013 10:28:54 GMT -5
Has anyone tried using a bead of auto glass adhesive below the gasket. Then press the glass into place and install the trim boards. I'm not sure what would happen if the glass ever needed to be replaced. Any thought?
|
|
mobiltec
1K Post Member
Restoring The 57 Shasta
Posts: 1,134
|
Post by mobiltec on Jan 20, 2013 0:53:40 GMT -5
Has anyone tried using a bead of auto glass adhesive below the gasket. Then press the glass into place and install the trim boards. I'm not sure what would happen if the glass ever needed to be replaced. Any thought? I thought of running a bead of something all the way around although there is not much rooom for a good bead. Problem is that the surface you are puting the glass against is not flat. Not only is it wobbly because of the screws, it's out of plane one corner to the other... Or it's rounded. Or what ever, but it's not flat. So it takes a lot of pressure on the glass to get a good seal with the rubber glass seal. If only you could put enough pressure on the glass to accomplish this, it would work... I learned something from my mentor Bob and will be trying it out tomorrow. I'll let you know how it works out. To be continued.... |
|
mobiltec
1K Post Member
Restoring The 57 Shasta
Posts: 1,134
|
Post by mobiltec on Jan 29, 2013 17:03:36 GMT -5
I think it worked... I just finished using the "Bob Ross" method of sealing up these solid windows. It looks like it worked well. I like Embee's solution also but goop is never a permanant solution. Maybe a mix of Embee's fix and Bob's fix used together? Anyways I did a video of the install and will be editing it tonight and then uploading it. My internet connection is the worst you can get and still call it "high speed" so it will take all night to upload. I'll post the link here tomorrow once it is up on my You Tube channel. It's exciting to see something finally work on this trailer. And it went without a hitch. (Pun intended)  |
|
Gone Kayaking
1K Post Member
long live the Vintage Shasta Trailer Forum....we're gone but you are not forgotten!
Posts: 1,600
|
Post by Gone Kayaking on Jan 29, 2013 18:48:19 GMT -5
we await!
|
|
mobiltec
1K Post Member
Restoring The 57 Shasta
Posts: 1,134
|
Post by mobiltec on Jan 29, 2013 21:38:36 GMT -5
Well I don't think I'm going to get the nobel prize for this one. It looks as though you folks have been struggling with this one for a while now. And our solution may not stand up to time. Who knows. Time will tell I guess. Anyways, here's the final result photos. I'll get the video up as by tomorrow sometime. It came out pretty clean I think. Remember this was Bob's idea LOL...  Attachments:
|
|
mobiltec
1K Post Member
Restoring The 57 Shasta
Posts: 1,134
|
Post by mobiltec on Jan 29, 2013 21:40:45 GMT -5
Second photo Attachments:
|
|
mobiltec
1K Post Member
Restoring The 57 Shasta
Posts: 1,134
|
Post by mobiltec on Jan 29, 2013 21:41:14 GMT -5
Third photo. The You can really tighten the window up to the glass seal and not break the glass. And no goop. Attachments:
|
|
cowcharge
1K Post Member
I suffer from Shastasomiasis.
Posts: 1,471
|
Post by cowcharge on Jan 30, 2013 11:51:06 GMT -5
Looks like a window to me...
|
|
mobiltec
1K Post Member
Restoring The 57 Shasta
Posts: 1,134
|
Post by mobiltec on Jan 30, 2013 12:06:56 GMT -5
Looks like a window to me... Yep looks pretty much normal eh? There are two things different about it and the installation procedure though. I will be showing that in the video but it got late last night when I was editing and I finally had to go to bed. Today I will finish the editing and put it up. The main difference here that you can't see from the photos is that I got a really tight seal all the way around without worrying about the glass breaking. And if you'll notice, the screws are painted along with the body so I was not able to tighten the metal to the glass using the screws as many here have done in the past. That is because it was not neccessary. A lot of the procedure is the same way Embee did it. By pushing the glass stop up against the glass really hard and then fastening. That's half the secret. The video will show the other half and all will become "clear". |
|
Deleted
Deleted Member
Posts: 0
|
Post by Deleted on Jan 30, 2013 13:05:43 GMT -5
Mobiltec, Thanks for your efforts, looking forward to the video.
|
|
mobiltec
1K Post Member
Restoring The 57 Shasta
Posts: 1,134
|
Post by mobiltec on Jan 30, 2013 16:58:31 GMT -5
Thanks SMCCUSK...
This forum has been very helpful to me as has Bob and Cindy Ross. I take no credit at all for any of this. Most of what I do I put on video to help out people who are new to this stuff because it is so overwhelming in the beginning. Between all of us it seems that we can come up with solutions to these common problems. Some things just can not be fixed however and that's when it's time to re-design things. I think that is what we are doing here and my solution may not be the best but it's a step in the right direction I think. It's nice to be able to keep things original looking if at all possible.
|
|


